We are running a 4wk course for 12-16yrs in Stroud.
Caroline Kelly and I will be running this Forestry and Construction Course
for Teenagers Starting on Wednesday 6 th April to take place on Tuesdays, Wednesdays and Thursdays until the 28th April. Held at Hawkwood College, Stroud, Gloucestershire. The course will be on 11 full days 9am – 4pm. Hot lunches will be cooked over an open fire using organic vegetables prepared on site by the participants. The cost is £30 per day including lunch. if you are interested please email Caroline at ckellywaldorfcollege@gmail.com or phone 07818342758. If you’d like to see more details of these events visit…our education page . Accomodation might be possible for people travelling a distance. Cheers Adrian
Day in the life of an Axeman
I strode out this morning across field and lane carrying nowt but lunch box and axe. At the woods I joined my work fellows and we struck a fire first thing. Fairly soon wood chips where flying and the thud of axe strikes resounded through the wood, thickening the blanket of silence around us. A timeless quality imbued the scene. The brutal reality of a razor sharp cold lump of steel on a stick. Why is that so appealing? There’s no escaping it, it’s a primal experience to pit your body weight and your sweat against the might of a huge tree towering above you. You huff and puff, grunt and curse but there is a timeless poetry as the axe swings through the air bighting deep into the timber. It’s a giddy sensation when that tree finally yields and starts to move.
Then the chainsaws spluttered and growled into action. This was a workday at Stroud Community Woodland Coop. I’d like to think that those of us axing that day had more fun than those chains awing but it’s probably not true. However we reveled in our less-productive shared adventure. My three cohorts had no idea they might be felling a tree together today as they had no experience, skills or training and assumed that woodland work was for the certified chainsaw users only. As the light started to receded I lifted my axe and ducked out of the wood to stroll home cross-country. Time maybe to explore a new route home, a perfect day from a time gone by.
rocket stove – an upgrade
Oh the joy of cooking outdoors. Possibly it is only surpassed by the subsequent joy of devouring outdoors the scrummy things that you cooked! Now I like a good campfire as much as the next kippered outdoorswoman, but when camping in the woods for up to a month at a time, cooking every meal, everyday over a fire makes smoke inhalation quite speedily loose its charm. With all the free fuel available, literally dropping from the sky, who is going to spend folding cash on camping gas? Enter the rocket stove, bosom buddy of woodland life.
We made our first rocket stove about 10 years ago and used if intermittently until the flue burned through and a sizeable quantity of the insulation escaped. It then went into extended hibernation (also known as ‘storage’) but was refurbished and brought back into service about 2 years ago. Thank HEAVENS! Now we have it in use again, I can’t believe we camped without it for so long.
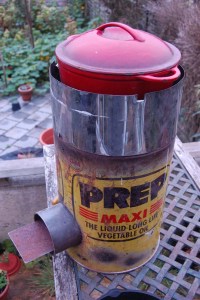
It is completely smokeless once up and going and is extremely efficient, boiling water quickly and with very little fuel. It can be set on a tree stump or table so there is no stooping to tend fire or food. It has totally transformed our experience of cooking in the woods, and is the perfect partner to our lovely haybox – of which more in the next blog. In case you are considering making one, which we highly recommend, there is only one limiting factor that we have found to cooking on them: a rocket stove has a VERY tiny burn chamber. This is one of the strengths of the design, making best use of small amounts of kindling-type fuel. However, it does mean that you must keep feeding the fire as there is not much in the way of embers to keep the fire going if you turn your back for long. In all other regards the rocket stove is king.
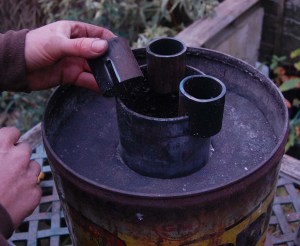
Our original stove was made according to a common quick and easy design. A large cooking oil tin and a section of 4” cheap ducting pipe form the main components. This flue has had to be replaced twice in the time we’ve used it as it burns through quite quickly. This time, its third incarnation, I have replaced the ducting with 2mm thick, 4.5” diameter steel tube, welded into an L bend. The usual cheap and cheerful design of rocket stove uses the top rim of the wind-shield to support the handles of the cooking pot, the belly of which dangles over the flame. In our upgrade the weight of the pot is now supported directly by the flue. Three chopped bits of scaffolding tube which slot onto the flue create space for the rising flame and hot gasses to escape whilst giving a wider seat on which the pot can sit. These parts are removable making the fitting of the flue, insulation and ash disc easier. The new wind-shield now not supporting the pot can accommodate any depth of pot and being built in two parts also allows the use of a pot or frying pan with one long handle which can poke through. The wind shield is cut from old 10” diameter stainless steel flue pipe.
free standing roundhouse – notes
This free standing roundhouse is an 8.5mtr outdoor classroom for Brixham Cofe School. The posts sit on stone at ground level. The school hired me to build the timber frame and will be adding the turf roof and membrane themselves.
I recon the buried post method is in appropriate for turf roofed public buildings. Turf roofs are a heavy load to support over the heads of many people and need to be secure for a couple of decades. The buried post method will inevitably rot and fail. It is fine for personal use where the builder/owner is around to keep an eye on it but quite a risk if it’s a pubic building somewhere else. I have built buried post roundhouses for schools before, like the one pictured below for a school in London. This uses light timbers and a soft top. I have written a fact sheet for lili about roundhouses, which talks more about this issue. Download at http://www.lowimpact.org/factsheet_roundhouses.html
All components in the Brixham roundhouse are larch. Larch is at the low end of the acceptable range of out-door durable construction timbers. Larch is however cheaper than chestnut and that is why we’ve had to use in on this occasion. There are 10 up-rights at about 12” thick at the top end to accommodate the ring beam tenons. These tenons are 5’x5”x3” and are pinned in place. The ring beams are about 12”x3”. Every up right is wind-braced with an 8”x2.5” beam mortised into the up right with a side shoulder tenon. Each primary rather is pinned at the apex and housed and pinned at the post end. I dropped this reciprocal roof in the conventional way. I set the rafters up at 18dec and after the drop ended up with 16dec. I tend to work out the roof geometry on paper first, (try it for real at ground level first if you are un-sure). I’m finding now that my roofs are quite predictable dropping about 6” so I can be fairly accurate in setting the final roof pitch. The secondary rafters are pinned to the primary rafters and to an up right mounted on the ring beam. The edge boards are 8”x3” and coach screwed and pinned. We have battened the roof with milling off-cuts.
Japanese rib saw
Temagori Nokogiri Rip cut for green wood.
Timber framing rip saw
Like all Japanese saws this cuts on the pull. It is a little bit of a fiddle to get going as the teeth are so big but once you are cutting it’s a demon. It’s a very aggressive fast cutting saw, which so far I’ve used on larch timber frames. It’s really only suited to large timber work although you can be fairly accurate with practise. The real joy of this saw is the ‘no crab claw phenomena’. Meaning that you’ll not develop one huge sawing arm whilst the other withers. This is a two handed saw. Your sawing action uses the whole torso equally putting far less twist strain on the body and less reliance on the joints and muscles of one arm. Using both arms and torso gives you a much more powerful stroke and is less tiring.
Specs
Blade Length: 480 mm (19 in.)
Total Length: 7 90 mm (31 in.)
Width of blade front: 100 mm (4 in.)
Width of blade near shaft: 80 mm (3 in.)
Thickness of blade near teeth: 1.3 mm
Thickness at the back: 0.7 mm
Kerf: 2.6 mm
as above, but for ripping and resawing.
Pitch front: 9 mm (3 TPI)
Pitch near handle: 7 mm (4 TPI)
Order nr. 312020 cart
Price ✱€ 129.00


