Kevin McCloud’s Shed, Kevin McCloud’s Man Made Home, Building process notes for self builders

one man and his shed - building process

‘Guided’ or ‘assisted’ building projects.

This type of build is what I call a ‘guided’ or ‘assisted’ building project. Commonly the owner will have a passion for building or design but not the time or experience to actually do it all. Kevin probably does have the skills to build something on this scale but also juggles many other projects, so joined us on site when he was free. He also sent regular pencil sketches and CAD designs by email and discussed the next stages by phone so the project kept moving forward.

Assisted builds are a good option to consider for the DIY shed builder short of time or skills.

Kevin McCloud’s Shed, Kevin McCloud’s Man Made Home, Timber frame notes for the self builder

one man and his shed - the frame

Pictured here is the finished frame and studding.

Pictured here is the finished frame and studding. Kevin was keen for the line of the roof to continue as a ‘folded’ profile down the north wall. His idea was for this wall also to be shingled as a continuation of the roof. I’m very glad he suggested this as I’ve enjoyed building it and it looks great. There is a small 1” drip overhang, which is the absolute minimum. It is just possible in this picture to see the blue sealed sections of end grain. I like to seal end grain in these situations to reduce cracking during the drying process. You can also see the ratchet strap which held the south wall in place before ribs and braces were attached.

Further learning;
There are lots of books and a few courses on timber framing. You could book yourself on to one of our marvellous 5 day courses in Gloucestershire (www.wholewoods.co.uk) or check out the Low Impact Living Initiative for other venues (www.lowimpact.org).
For books – http://www.eco-logicbooks.com/

Kevin McCloud’s Shed, Kevin McCloud’s Man Made Home, Lifting notes for the self builder

one man and his shed - pulleys

basic tripod arrangement to hoist the swept oak beams up to the wall plate.

We used a basic tripod arrangement to hoist the swept oak beams up to the wall plate. The mechanism had to be easily controllable and very safe so that it could all be done in one day, with assistance from people who had no previous experience. This can be achieved by pre-cutting and fitting as much as possible in advance. We used 10mm rope, a block and tackle, three spruce poles roped together at the apex and also tied off at the bottom so the tripod legs can’t slip. You want to have sufficient mechanical advantage in your pulleys so that one person can operate the pulley and be able to have a hand free to tie off. When timber is in the air it is important to have clear instruction from one person.

Kevin McCloud’s Shed, Kevin McCloud’s Man Made Home, Curved timber notes for the self builder

One man and his shed - curved oak

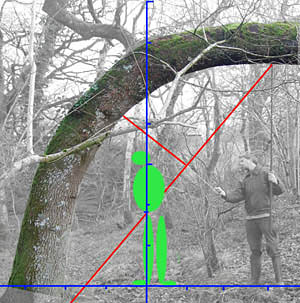
How to map a curved tree.

During my site visit we hit upon the idea of using a wonderful curved oak tree for structural beams in the building. I had not seen a tree quite like this one in ten years of doing this kind of work. Allowing the shape of natural materials to influence design is something I’m very keen on – I love to leave room in the master plan for the unknown and the unpredictable.

Kevin also seemed excited by the swept oak and incorporated it into his design. Before we felled the tree I produced a mapped graph of the swept beams that it would yield, along with approx section sizes that Kevin could feed into his CAD mock-ups. I achieved this by taking a flat-on photograph of the tree showing measurements and objects of known size. This image was then over-laid with scale rules in Photoshop.

Kevin McCloud’s Shed, Kevin McCloud’s Man Made Home, Planking notes for the self builder

one man and his shed - planking

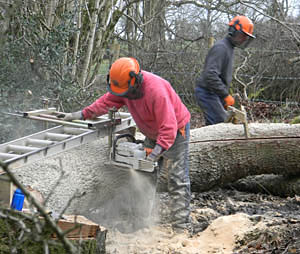
We used a Stihl 660 chainsaw running a 48” pico ripping chain and a Heath Robison chainsaw mill.

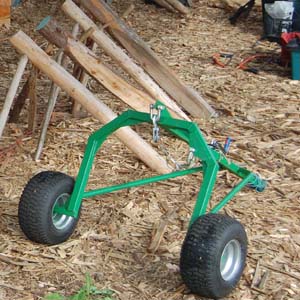
We de-limbed the big oak tree with chainsaws where it fell and the trunk sections were driven out with a very large logging arch. You don’t see this on TV, but it’s a beefy steel frame on wheels with an arched axle. The logging arch is driven over the trunk and the trunk is then winched up into the arch at its centre of balance. One end is then secured to the tractor and off you go.

logging arch - Kevin McCloud's Shed - Kevin McCloud’s Manmade Home

logging arch to move heavy timbers

I extrapolated a cutting list from the design drawings for Nick, our milling expert, and he made sure that we got the most economical use of the timber. If you can build with green timber you do save a lot of money, and if it’s local or your own wood then it’s low timber miles too, which is great.

We decided to plank the swept oak where it fell and then carry the planks out by hand. It’s more difficult to get a bendy tree into an arch and in any case, a normal timber mill can’t mill it. The only way to plank such a curve yourself is to do it by hand with a chainsaw mill. These attachments to chainsaws sit on runners that are in turn attached to the tree. A ladder works well as the runners, but the supporting framework we normally make bespoke for each tree using wooden battens. Getting this framework right sets your cutting line parallel to the greatest volume of timber in the tree, to get the best use of the wood. I rip-sawed these huge through-cut planks down the pith with a chainsaw, then made parallel cuts removing the bark and sap wood on the sides. It will be interesting to see how much these beams twist and move over time as they shrink. We used a Stihl 660 chainsaw running a 48” pico ripping chain and a Heath Robinson chainsaw mill.